 Pre built UI
Paid Feature
This is a paid feature.
You can click on the Enable Paid Features button on our dashboard, and follow the steps from there on. Once enabled, this feature is free on the provided development environment.
Multiple frontend domains with separate backends
You can use the following guide if you have a single Authorization Service that is used by multiple applications.
In turn, each app has separate frontend and backend instances that are served from different domains.
Using the actual OAuth 2.0 terminology, each application can be considered a Client while the backends are also Resource Servers.
info
Note that, if the frontends and backends are in different sub domains, you don't need to use OAuth and can instead use session sharing across sub domains.
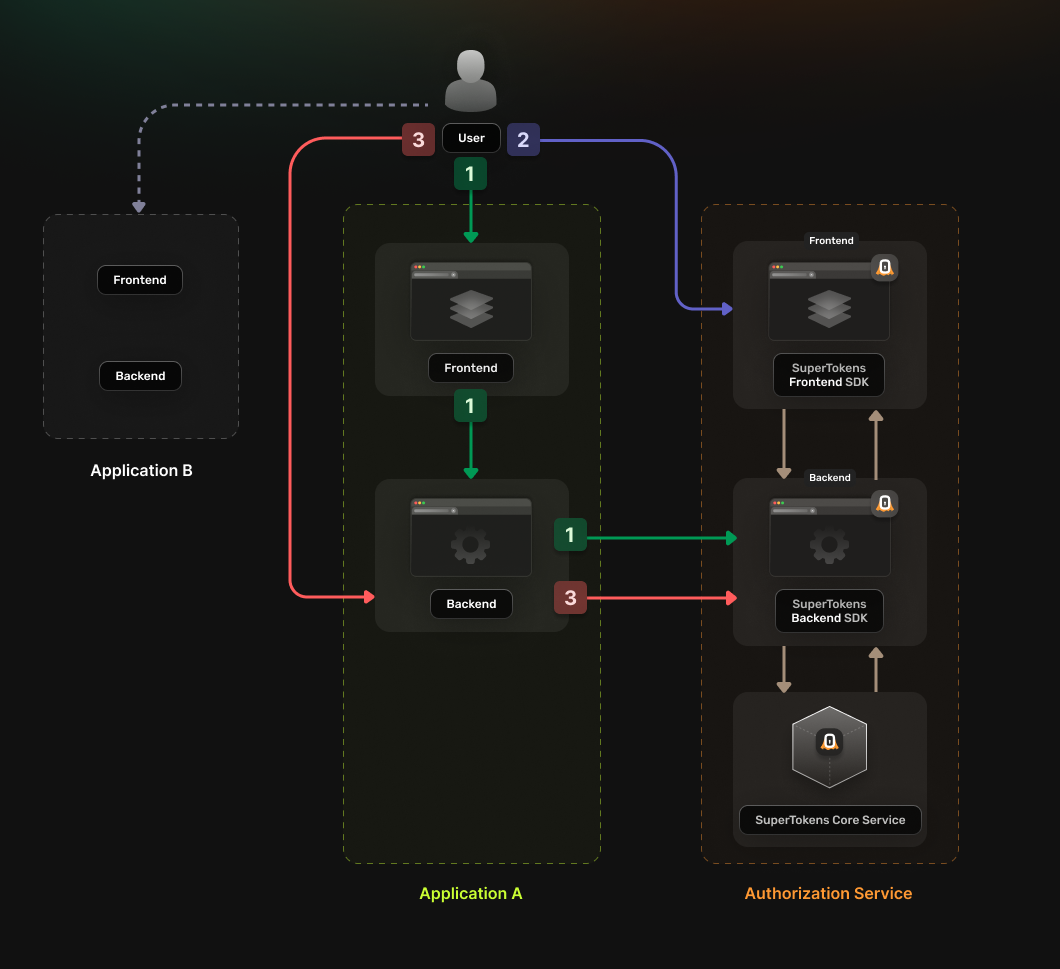
The authentication flow will work in the following way:
- The User accesses the
frontendapp- The application
frontendcalls a login endpoint on thebackendapplication. - The
backendapplication generates anauthorizationURL to the Authorization Service and redirects the user to it. - The Authorization Service backend redirects the user to the login UI
- The application
- The User completes the login attempt
- The Authorization Service backend redirects the user to a
callback URLthat includes the Authorization Code.
- The Authorization Service backend redirects the user to a
- The User accesses the callback URL
- The Authentication Code gets sent to the application
backend - The
backendexchanges the Authentication Code for an OAuth2 Access Token - The
backendsaves the received token in a server session and sends it back to thefrontendas a cookie.
- The Authentication Code gets sent to the application
The frontend can now use the new cookie to access protected resources from the backend.
info
This guide assumes that you already have setup and configured SuperTokens in your Authorization Service.
For more information on how to do that please check our quickstart guides.
1. Enable the OAuth2 features from the Dashboard#
You will first have to enable the OAuth2 features from the SuperTokens.com Dashboard.
- Open the SuperTokens.com Dashboard
- Click on the Enabled Paid Features button
- Click on Managed Service
- Check the OAuth 2.0 option
- Click Save
Now you should be able to use the OAuth2 recipes in your applications.
2. Create the OAuth2 Clients#
- Single app setup
- Multi app setup
For each of your applications you will have to create a separate OAuth2 client. This can be done by directly calling the SuperTokens Core API.
# You will have to run this for each one of your applications
# Adjust the client_name and redirect_uri based on that
curl -X POST /recipe/oauth2/admin/clients \
  -H "Content-Type: application/json" \
  -H "api-key: " \
  -d '{
      "clientName": "<YOUR_CLIENT_NAME>",
      "responseTypes": ["code", "id_token"],
      "grantTypes": ["authorization_code", "refresh_token"],
      "scope": "offline_access <custom_scope_1> <custom_scope_2>",
      "redirectUri": ["https://<YOUR_APPLICATION_DOMAIN>/oauth/callback"]
    }'
clientName- A human-readable name of the client that will be used for identification.responseTypes- Specifies the types of responses your client expects from the Authorization Server. Most of the time, you would need the following two to be present:code: Indicates that the Client will receive an Authorization Code that will be exchanged for an OAuth2 Access Token.idToken: Indicates that the Client expects an ID Token
grantTypes- The grant types that the Client will use.authorization_code: Allows exchanging the Authorization Code for an OAuth2 Access Token.refresh_token: Allows exchanging the OAuth2 Refresh Token for a new OAuth2 Access Token.
redirectUri- A list of URIs to which the Authorization Server will send the user-agent (browser) after completing the authorization step. These can be deep links to mobile or desktop apps as well, but they must be exact URLs, without wildcards.scope- A space separated string of scopes that the Client will request access to.offline_access: You need to include this scope if you want to use the OAuth2 Refresh Token to get a new OAuth2 Access Token.
If the creation was successful, the API will return a response that looks like this:
{
    "clientName": "<YOUR_CLIENT_NAME>",
    "clientId": "<CLIENT_ID>",
    "clientSecret": "<CLIENT_SECRET>",
    "callbackUrls": ["https://<YOUR_APPLICATION_DOMAIN>/oauth/callback"],
}
Based on the client creation process we can also infer two additional values that we will need later on:
authorizeUrlcorresponds to<YOUR_API_DOMAIN>/auth/oauth/authtokenFetchUrlcorresponds to<YOUR_API_DOMAIN>/auth/oauth/token
caution
You will have to save this response because we do not persist it internally for security reasons. In the next steps we will use the values to complete several configurations.
Change the default token lifespan#
By default, the tokens used in the authorization flow will have the following lifespans:
- OAuth2 Access Token: 1 hour
- OAuth2 ID Token: 1 hour
- OAuth2 Refresh Token: 30 days
If you want to change the default values you need to specify additional properties in the Client creation request body.
Use string values that signify time duration in milliecoseconds, seconds, minutes or hours (e.g. "2000ms", "60s", "30m", "1h").
There are no limits on the duration of each token.
- OAuth2 Access Token - Set the
authorizationCodeGrantAccessTokenLifespanproperty. - OAuth2 ID Token - Set the
authorizationCodeGrantIdTokenLifespanproperty. - OAuth2 Refresh Token - Set both the
authorizationCodeGrantRefreshTokenLifespanand therefreshTokenGrantRefreshTokenLifespanproperties to the same value.
Disable Refresh Token Rotation#
By default, a refresh token is one time use. This means, once a refresh token is used to get a new access token, it cannot be used again. If your use case cannot accomodate the process of changing the OAuth2 Refresh Token for a new one, you can make it so that this behavior does not apply for your implementation.
In order to achieve this behavior just set the enableRefreshTokenRotation property to false in the Client creation request body.
3. Set Up your Authorization Service#
Configure the Authorization Service Backend#
In your Authorization Service you will need to initialize the OAuth2Provider recipe. The recipe will expose the endpoints needed for enabling the OAuth 2.0 flow.
- NodeJS
- GoLang
- Python
- Other Frameworks
Important
Update the supertokens.init call to include the OAuth2Provider recipe.
Add the import statement for the recipe and update the list of recipes with the new initialization step.
import supertokens from "supertokens-node";
import OAuth2Provider from "supertokens-node/recipe/oauth2provider";

supertokens.init({
    supertokens: {
        connectionURI: "...",
        apiKey: "...",
    },
    appInfo: {
        appName: "...",
        apiDomain: "...",
        websiteDomain: "...",
    },
    recipeList: [
        OAuth2Provider.init(),
    ]
});
caution
At the moment we do not have support creating OAuth2 providers in the Go SDK.
caution
At the moment we do not have support creating OAuth2 providers in the Python SDK.
Configure the Authorization Service Frontend#
Initialize the OAuth2Provider recipe on the frontend of your Authorization Service.
info
If you want to use your own custom UI check our separate guide that explains all the steps that you have to take into account.
- React
- Angular
- Vue
Add the import statement for the new recipe and update the list of recipe to also include the new initialization.
import OAuth2Provider from "supertokens-auth-react/recipe/oauth2provider";
import SuperTokens from "supertokens-auth-react";

SuperTokens.init({
    appInfo: {
        appName: "...",
        apiDomain: "...",
        websiteDomain: "...",
    },
    recipeList: [
        OAuth2Provider.init()
    ]
});
Include the pre built UI in the rendering tree.#
Update the AuthComponent so that it also includes the OAuth2Provider recipe.
You will have to add a new item in the recipeList array.
  import {init as (window as any).supertokensUIInit} from "supertokens-auth-react";
  import (window as any).supertokensUIOAuth2Provider from "supertokens-auth-react/recipe/oauth2provider";
  import { Component, OnDestroy, AfterViewInit, Renderer2, Inject } from "@angular/core";
  import { DOCUMENT } from "@angular/common";

  @Component({
      selector: "app-auth",
      template: '<div id="supertokensui"></div>',
  })
  export class AuthComponent implements OnDestroy, AfterViewInit {

      constructor(
          private renderer: Renderer2,
          @Inject(DOCUMENT) private document: Document
      ) { }

      ngAfterViewInit() {
          this.loadScript('^{jsdeliver_prebuiltui}');
      }

      ngOnDestroy() {
          // Remove the script when the component is destroyed
          const script = this.document.getElementById('supertokens-script');
          if (script) {
              script.remove();
          }
      }

      private loadScript(src: string) {
          const script = this.renderer.createElement('script');
          script.type = 'text/javascript';
          script.src = src;
          script.id = 'supertokens-script';
          script.onload = () => {
              (window as any).supertokensUIInit("supertokensui", {
                  appInfo: {
                      appName: "<YOUR_APP_NAME>",
                      apiDomain: "<YOUR_API_DOMAIN>",
                      websiteDomain: "<YOUR_WEBSITE_DOMAIN>",
                      apiBasePath: "/auth",
                      websiteBasePath: "/auth"
                  },
                  recipeList: [
                    // Don't forget to also include the other recipes that you are already using
                    (window as any).supertokensUIOAuth2Provider.init()
                  ],
              });
          }
          this.renderer.appendChild(this.document.body, script);
      }
  }
Update the AuthView component so that it also includes the OAuth2Provider recipe.
You will have to add a new item in the recipeList array, inside the (window as any).supertokensUIInit call.
    import {init as (window as any).supertokensUIInit} from "supertokens-auth-react";
    import (window as any).supertokensUIOAuth2Provider from "supertokens-auth-react/recipe/oauth2provider";
    <script lang="ts">
        import { defineComponent, onMounted, onUnmounted } from 'vue';
        export default defineComponent({
            setup() {
                const loadScript = (src: string) => {
                    const script = document.createElement('script');
                    script.type = 'text/javascript';
                    script.src = src;
                    script.id = 'supertokens-script';
                    script.onload = () => {
                        (window as any).supertokensUIInit("supertokensui", {
                            appInfo: {
                                appName: "<YOUR_APP_NAME>",
                                apiDomain: "<YOUR_API_DOMAIN>",
                                websiteDomain: "<YOUR_WEBSITE_DOMAIN>",
                                apiBasePath: "/auth",
                                websiteBasePath: "/auth"
                            },
                            recipeList: [
                              // Don't forget to also include the other recipes that you are already using
                              (window as any).supertokensUIOAuth2Provider.init()
                            ],
                        });
                    };
                    document.body.appendChild(script);
                };

                onMounted(() => {
                    loadScript('^{jsdeliver_prebuiltui}');
                });

                onUnmounted(() => {
                    const script = document.getElementById('supertokens-script');
                    if (script) {
                        script.remove();
                    }
                });
            },
        });
    </script>

    <template>
        <div id="supertokensui" />
    </template>
4. Set Up Session Handling in Each Application#
In each of your individual applications you will have to setup up logic for handling the OAuth 2.0 authentication flow.
We recommend using a generic OICD or OAuth2 library in order to do this.
- NodeJS
- GoLang
- Python
- Java
- PHP
- C#
You can use the passport-oauth2 library.
Just follow the instructions on the library's page and setup your application backend.
The configuration parameters can be determined based on the response that we received on step 2, when we created the OAuth2 Client.
authorizationURLcorresponds toauthorizeUrltokenURLcorresponds totokenFetchUrlclientIDcorresponds toclientIdclientSecretcorresponds toclientSecretcallbackURLcorresponds to a value fromcallbackUrlsscopecorresponds toscope
Make sure that you expose an endpoint that will call passport.authenticate('oauth2').
This way the user will end up accessing the actual login page served by the Authorization Service.
You can use the OAuth2 library.
Just follow these instructions and implement it in your backend.
The configuration parameters can be determined based on the response that we received on step 2.
ClientIDcorresponds toclientIdClientSecretcorresponds toclientSecretScopescorresponds toscopeEndpoint.AuthURLcorresponds toauthorizeUrlEndpoint.TokenURLcorresponds totokenFetchUrl
Make sure that you expose an endpoint that will redirect to the authentication URL obtained from calling AuthCodeURL.
This way the user will end up accessing the actual login page served by the Authorization Service.
You can use the AuthLib library.
Just follow these instructions and implement it in your backend.
The configuration parameters can be determined based on the response that we received on step 2.
client_idcorresponds toclientIdclient_secretcorresponds toclientSecretscopecorresponds toscopeauthorization_endpointcorresponds toauthorizeUrltoken_endpointcorresponds totokenFetchUrl
Make sure that you expose an endpoint that will redirect to the authentication URL obtained from calling create_authorization_url.
This way the user will end up accessing the actual login page served by the Authorization Service.
You can use the League OAuth2 Client library.
Just follow these instructions and implement it in your backend.
The configuration parameters can be determined based on the response that we received on step 2.
clientIdcorresponds toclientIdclientSecretcorresponds toclientSecretredirectUricorresponds to a value fromcallbackUrlsurlAuthorizecorresponds toauthorizeUrlurlAccessTokencorresponds totokenFetchUrl
Make sure that you expose an endpoint that will redirect to the authentication URL obtained from calling getAuthorizationUrl.
This way the user will end up accessing the actual login page served by the Authorization Service.
You can use the Spring Security library.
Just follow these instructions and implement it in your backend.
The configuration parameters can be determined based on the response that we received on step 2.
client-idcorresponds toclientIdclient-secretcorresponds toclientSecretscopecorresponds toscopeissuer-uricorresponds to<YOUR_API_DOMAIN>/auth
You can use the IdentityModel library.
Just follow these instructions and implement it in your backend.
The configuration parameters can be determined based on the response that we received on step 2.
Addresscorresponds to<YOUR_API_DOMAIN>/authClientIdcorresponds toclientIdClientSecretcorresponds toclientSecretRedirectUricorresponds to a value fromcallbackUrls
Make sure that you expose an endpoint that will redirect to the authentication URL obtained by using this example. This way the user will end up accessing the actual login page served by the Authorization Service.
info
If you want to use the OAuth2 Refresh Tokens make sure to include the offline_access scope during the initialization step.
5. Update the login flow in your frontend applications#
In your frontend applications you will have to add a login action that will direct the user to the authentication page.
The user should first be redirected to the backend authentication endpoint that was defined during the previous step.
There the backend will generate a safe authorization URL using the OAuth2 library and then redirect the user there.
After the user has logged in from the Authorization Service they will be redirected to the backend callback URL.
Then the authentication session will be created and the backend will send it to the user agent as a cookie.
6. Test the new authentication flow#
With everything set up, you can now test your login flow. Just use the setup that you have created in the previous step to check if the authentication flow completes without any issues.
